As a gamer, you likely prefer Steam as a game launcher over everything else, notably the Microsoft Store. Steam supports adding non-Steam games, but Microsoft makes it stupidly complicated to run their store content from anywhere else – at least if you do not like Windows shortcuts.
I wanted to add Gears of War 4 to Steam, a game only available in the Microsoft Store. Here is what I did and what should also work for other titles or applications.
First, there is no way around a shortcut. However, it is only temporary and serves as the starting point. If you are lucky, it is all you need. You can delete the shortcut after all is said and done.
Get the App Launch Target (Easy Mode)
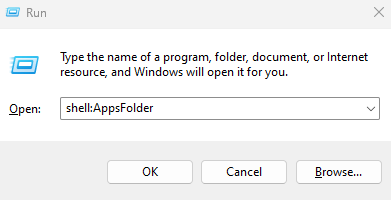
To create a shortcut of the game, press “Win+R” to open the Run prompt and enter shell:AppsFolder.
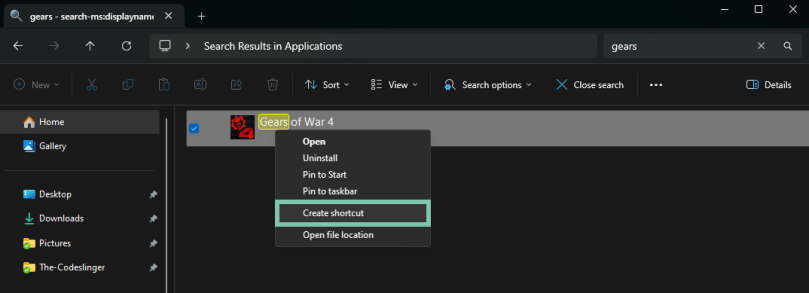
Locate your game and create a shortcut. Windows will notify you that it cannot create a shortcut in the apps folder and will instead place it on the desktop.
Right-click on the shortcut and show the properties. Navigate to the “Shortcut” tab and find the “Target” text field. This is the value that we need. If you are lucky, you are almost done if the value is fully visible.
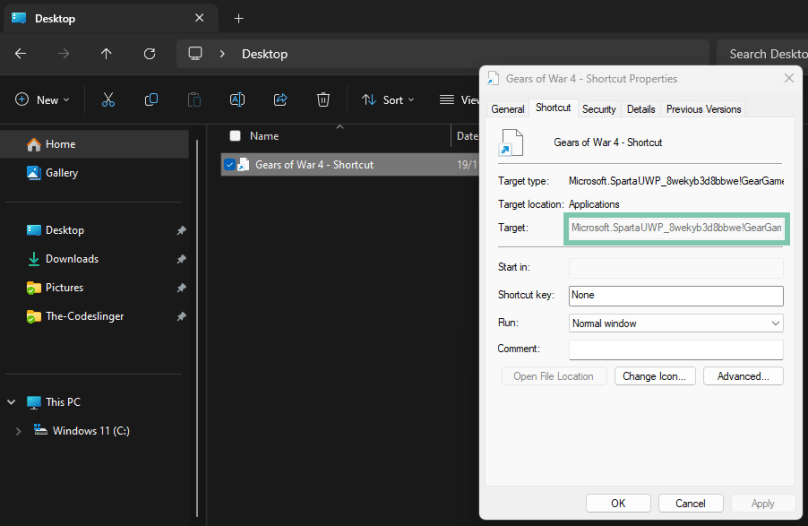
In the case of Gears 4, the value is too long for the text field, and no tooltip shows the complete string. Now, the drama begins.
Get the App Launch Target (Hard Mode)
If you only want the final result, skip to the next section for a PowerShell command to give you the complete launch command. If you are interested in the individual steps, keep reading.
The information you want is in the AppxManifest.xml file in the game’s install directory. Unfortunately, Windows makes it extra tricky to just browse there using the Explorer. The “WindowsApps” folder cannot be opened by double-clicking because Windows will throw a permissions error in your face. However, if you know the exact path of the game, you can open it directly in Explorer. That makes sense, right? Right?
(No)
Using PowerShell, you can list all installed applications. To simplify it, limit the list to only returning the one you want. You apply a Where-Object filter with a part of the “Target” string from the shortcut. You can also type everything, but I am lazy, so I only include as much as necessary to make it unique.
Get-AppxPackage | Where-Object { $_.PackageFamilyName -like "*SpartaUWP_8wekyb3d*" }
PowerShell will print the Appx package information if you have not made a typo.
Name              : Microsoft.SpartaUWP
Publisher         : CN=Microsoft Corporation, O=Microsoft Corporation, L=Redmond, S=Washington, C=US
Architecture      : X64
ResourceId        :
Version           : 14.4.0.2
PackageFullName   : Microsoft.SpartaUWP_14.4.0.2_x64__8wekyb3d8bbwe
InstallLocation   : C:\Program Files\WindowsApps\Microsoft.SpartaUWP_14.4.0.2_x64__8wekyb3d8bbwe
IsFramework       : False
PackageFamilyName : Microsoft.SpartaUWP_8wekyb3d8bbwe
PublisherId       : 8wekyb3d8bbwe
IsResourcePackage : False
IsBundle          : False
IsDevelopmentMode : False
NonRemovable      : False
Dependencies      : {Microsoft.VCLibs.140.00_14.0.32530.0_x64__8wekyb3d8bbwe}
IsPartiallyStaged : False
SignatureKind     : Store
Status            : Ok
Using the InstallLocation, PackageFullName, and the XML filename AppxManifest.xml, you can construct the full path of the file that you need to open in the next step.
C:\Program Files\WindowsApps\Microsoft.SpartaUWP_14.4.0.2_x64__8wekyb3d8bbwe\AppxManifest.xmlIn that file, you must locate the XML tag <Application>. The attribute value of Id immediately following the XML tag is the missing piece of the puzzle.

Putting it all together, you can construct the launch command for the game.
- Start with the text
shell:AppsFolder. - Append a backslash followed by the value of
PackageFamilyName. - Append an exclamation mark followed by the application
Idvalue from the XML file.
shell:AppsFolder\Microsoft.SpartaUWP_8wekyb3d8bbwe!GearGameShippingPublicTo confirm that it works, you can reopen the Run dialog and execute the command.
Get the App Launch Target (Programmer Mode)
I am a software developer, and if I am already getting my hands dirty in a shell, I could automate the whole process. Here is an unwieldy PowerShell command that constructs the game launch command for you.
Get-AppxPackage | Where-Object { $_.PackageFamilyName -like "*SpartaUWP_8wekyb3d*" } | ForEach-Object { "shell:AppsFolder\" + $_.PackageFamilyName + "!" + ([xml](Get-Content -Path ($_.InstallLocation + "\AppxManifest.xml"))).Package.Applications.Application.Id }Let me break it down so you understand what is happening and can be assured it is not doing anything you do not want.
The first piece is listing the applications and filtering for the one you want, like earlier.
Get-AppxPackage | Where-Object { $_.PackageFamilyName -like "*SpartaUWP_8wekyb3d*" }The resulting object is piped into the ForEach-Object cmdlet, which does several things. We only expect one result, though.
ForEach-Object {
    "shell:AppsFolder\"
    + $_.PackageFamilyName
    + "!"
    + ([xml](Get-Content -Path ($_.InstallLocation + "\AppxManifest.xml"))).Package.Applications.Application.Id }
It constructs the launch command in four steps:
- Start with the string
shell:AppsFolder\. - Append the value of
$_.PackageFamilyName, where$_represents the Appx package you obtained from theGet-AppxPackagecmdlet. - Append an exclamation mark.
- Load the XML file and extract the
Id.
The last step is a convoluted command that dynamically constructs the path from the Appx package and the known name of the AppxManifest.xml file. Remember that $_ still represents the Appx package here.
Get-Content -Path ($_.InstallLocation + "\AppxManifest.xml")Get-Content loads the file, and since it is XML, you can cast it accordingly with [xml].
[xml](Get-Content -Path ($_.InstallLocation + "\AppxManifest.xml"))Lastly, you can navigate the XML hierarchy by wrapping the above statement in parentheses and using the dot notation.
([xml]Get-Content …).Package.Applications.Application.IdAdd the Game to Steam
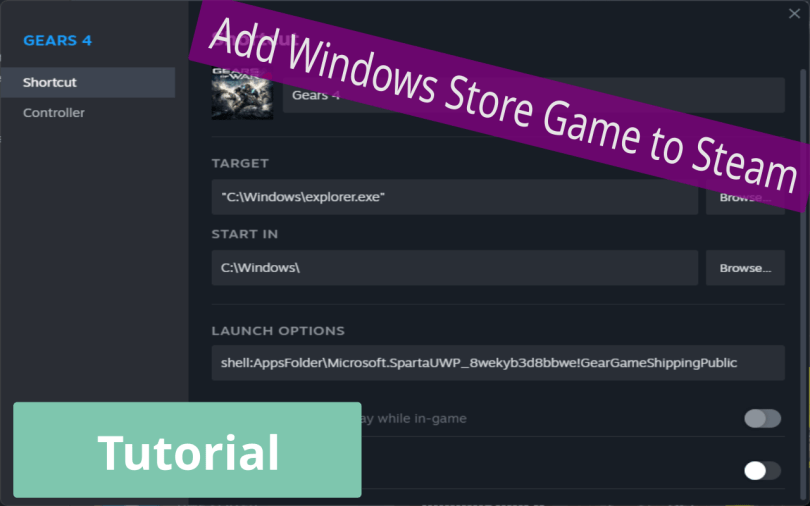
With the launch command in hand, you can add the non-Steam game to Steam. The configuration looks as follows.
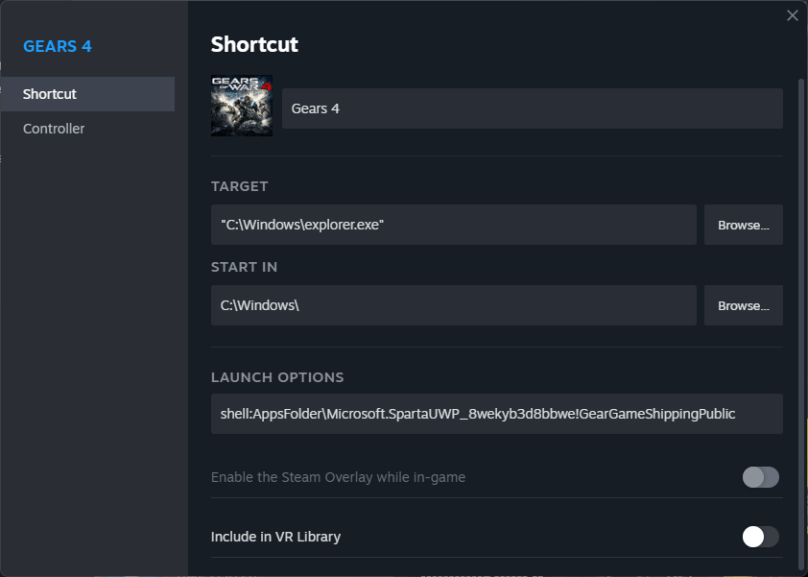
The application you are launching is actually the Windows Explorer. But by providing the launch command in the “Launch Options” field, you tell it to run a Microsoft Store application.
Once you have done that, you can select the game in Steam, and by right-clicking in the location where a game’s header image usually is, you get options to customize the icon and the background.

In my case, the options are different since I have already customized the appearance.
I hope this was helpful.
Thank you for reading.
